
Roses in Savannah

This piece was created as most of mine are with an amazing customer!! I love working with customers and getting to bring their vision to life!! I mean how cool is THAT!! I needed to find a dresser within specific measurements and nothing in the shop fit the bill... bummer!! Then I remembered my shipping crate has a few bedroom sets in it!! Doesn't everyone have shipping crates full of furniture in their yards???
Now that we have the dresser lets figure out design. "Grey but not grey.. Feminine but not too much.. Something extra but not too crazy.." All of this made total sense to me and help direct me through choices. With Dixie Belle Paint and all the other cool products available there's lots of choices! Let's start the process and see how this unfolds...
*** Disclosure***
I have added links to all of the products that I use and love to make it easier for you to duplicate the process. I do however get a small commission and/or retail some of the items. This keeps me in business producing and teaching and I am super grateful!!
Step One
This is ALWAYS step ONE. You must, must, must clean your furniture properly. Even if it looks clean.. even if it's from a clean house.. you MUST clean it! You are prepping your surface for paint adhesion. I use Dixie Belle's White Lightning cleaner. This product has some TSP in it and will seriously clean your piece. Pour warm water into your bucket and shake some white lightning mix about. I use a microfiber rag and clean down the piece well. I then use a clear clean water and a clean rag to wipe away any excess. Take off any hardware and give that a good clean also!
Step Two
Now you're clean and ready to paint!! This dresser had very little grit or grab so it was a perfect candidate for Dixie Belle's Slick Stick. This creates a surface for the paint to grab onto when the surface is naturally slick. It is not needed all the time, however it's a huge help in these situations!! Slick Stick is white and for this project that was ok, my plan was to sand down and see some of the white peaking through. To apply slick stick I just painted two thin coats. I use a cheaper brush for these products just out of habit to keep my good brushes for paint.
Step Three
Paint Time!!! I used my Dixie Belle Mini brush this one is my favorite. I painted the dresser with two coats of Savannah Mist. I choose to paint two coats because I wanted the Savannah mist to be more of a solid color on this piece.

Step Four
Time to Stencil!! I used the natural lines of the dresser to dictate my stencil placement and design. I choose Tea Rose Garden by ReDesign with Prima. These stencils stick to your piece and are SUPER simple for beginners. I made sure that my stencil was straight. I then stuck the stencil to the area that I wanted the design to be and rubbed it to make sure properly adhered. I use a premium chip brush from Dixie Belle when i stencil on larger stencils and pieces. I wanted the stencil color to compliment but also coordinate with the base color (Savannah Mist) so I chose Haint Blue.
To stencil put some of your paint on a paper plate. You need only a small amount of paint as the less you use the better your stencil will be. Put a touch of paint on your brush then dab brush on a clean space on the plate. This will take away a touch more paint and you'll be ready to stencil. Dab your brush on the stencil until then entire design is complete. You may choose to go over your stencil a few times with thin coats.

Once that strip was stenciled I then lined up the top of my next stencil strip with the bottom of my last to create the next section. I repeated this process until that entire section of dresser was complete. For the bottom drawers I choose to just use one strip down the center. You can see in this picture I thought about adding metallic buuuttttt I didn't like it so I sanded it off!! :)
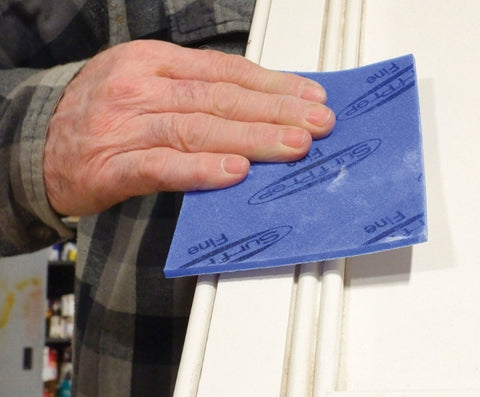
Step Five
Time to sand!! I sand EVERY piece prior to sealing it. I find that this creates a smoother surface for whatever sealant I choose and a smoother more finished final product. My go to sanding products are always by Surfprep Sanding. I am thrilled that they now offer an option for hand sanding!! I use their R.A.D. Pads and they're amazing!! Flexible, Foam Backed, the abrasive is top notch and lasts FOREVER! The price point is a deal also especially since they will last longer, and work better than regular old sand paper. I know this paragraph sounds a bit extra but I genuinely LOVE this new product!!

Sand over the entire piece!! Yep even over the stencil. I used Super Fine R.A.D. pads. This softened the look of the stencil (and helped correct goof spots.. they became distressed spots!) It brought up the white from the slick stick and the natural wood to add dimension.
Step Six
Sealing.. Now Dixie Belle does not need to be sealed but I usually do. For this piece I used White Wax. I love that wax creates a soft smooth feeling (I am not so secretly obsessed with soft things) White wax also tends to soften the colors used as the white sticks in all the grains and a a bit on the surface. I use a t-shirt rag and get a bit of the wax on my rag and rub on. I also buff as I go and grab more wax as needed. Make sure to buff well when you're done.

Dixie Belle Best Dang Wax in White


Final Step!!!
Hardware is the final step but VERY important!! Think of hardware as your furniture's jewelry!! This piece had the original hardware was both pretty and odd spacing so saving them was crucial!! They needed updating for sure so I used Dixie Belle's Steel Magnolias Metallic paint. I cleaned hardware with White Lightning and then painted. Once Dry put the hardware back on!! Easy Peasy!!!

Congratulations You're Done with your project!!!