
Leveling Up Your Antique Furniture with Découpage and Paint
There are times that we might think that the design of our antique furniture is getting outdated; it might not compliment your current interior design, or it’s getting pretty boring to look at, and you might end up replacing it, dumping it to rot in your stock room, or just throwing it out.
Before deciding of getting rid of it, think about why you brought there in the 1st place; maybe it’s from your old house, where your memories lingers, or maybe it’s a precious gift from your loved ones, whatever the origin of it, it deserves a 2nd chance to be worthy of a place inside your home. And by 2nd chance is by leveling it up with the help of different art supply like découpage and paint, to compliment your ever-changing home.
Trust me, you don’t need to be an artist to make wonderful pieces of art. Just follow these simple steps which you can apply to any project you have in mind, and don’t forget to just have fun in the process.
The Products that I used are as follows:
Step 1 – Apply base color on your project and let it dry. I used Savannah Mist as my base color on my project.
Note - 1 coat is enough to the portion where you want to put the découpage on.
Step 2 – To achieve stripes in your project, you need a surface delicate tape to space out your secondary paint.
Step 3 – Paint another layer of base paint to the portion that you want to stripe and let it dry. This will make our lines super crisp because any paint that is going to bleed through is our base paint. 
Step 4 – Paint your secondary color on the lines and let it dry before ripping the tape off. In my case, I used Rebel Yellow as my secondary color.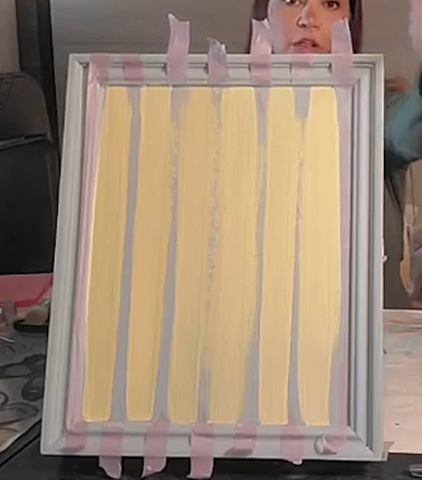

Step 5 - Even out the surface where you want to découpage using a surf prep rad pad or sanding paper. This will smoothen and even out the surface to avoid bubbles on your decoupage.
Note – Surf Prep Rad Pad is an abrasive with foam in the back which can be used to remove bubbles when applying découpage.
Step 6 – Apply topcoat on the portion where you want to place your découpage. This will act like a glue for your découpage. I used Clear Coat Satin by Dixie Belle. Make sure to apply just enough clear coat on the surface because applying too much will make your découpage too wet and fragile and might end up breaking.

Step 7 – Place the découpage on the surface with topcoat on and you can use your fingers, your Rad Pad's foam part or even the abrasive part, or your blue tool to smoothen the découpage out and remove all the wrinkles and bubbles.
Note – If there are portions on your découpage that’s not adhering, just add topcoat below those portions and continue scraping out the bubbles and wrinkles.
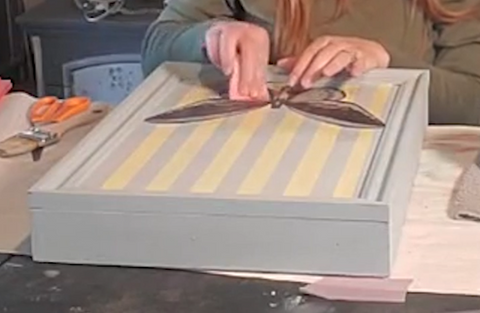
Step 8 – After the topcoat below the découpage is dry, apply a layer of topcoat above the découpage to permanently seal it.

Bonus Step – If you want to add metallic paint on your project, just sand the portion where you want to paint the metallics and you can use a tiny art brush or just your fingertip to paint them to your project. I prefer using my fingertip because it’s easier.


Finish Product
This method can also be applied to any kind of project, so be sure to explore and don’t be afraid to use what you learned here to make your very own furniture art!
Watch the full video tutorial for this project here